How to Doom?
Step-by-step tutorial on how to install Doom
Summary
- Download and unzip GZDoom
- Download and unzip game files
- Copy WAD files to GZDoom folder
- Start the Game
- Edit control settings
- Enjoy!
Materials Needed
- A Windows computer (all software used here is compatible with Win, Mac, and Linux, but instructions will be Windows-specific)
- An internet connection
- A mouse with a scroll wheel (controlling a first-person shooter with a trackpad is doable, but makes playing a lot more difficult)
Introduction
In my last post, I explained why I think that the original 1993 Doom is a good first choice if you are interested in learning how to play video games for the first time, especially on the computer as opposed to a video game console. In this post, I’ll be walking you through the process of downloading the files necessary to play Doom, getting them set up, starting Doom for the first time, and adjusting the controls to make the game more comfortable to play. The first part of this tutorial will cover installing the Shareware (i.e. free) version of Doom, which will allow anyone with access to the materials listed above to tryout the first 9 levels of the game. If you complete these and find yourself craving more, or if you’re ready to take the plunge right now, the second part of this tutorial will detail purchasing, downloading, and installing the full game (Ultimate Doom) from GOG (G/ood O/ld G/ames). Note: If you decide to purchase Ultimate Doom now, you still need to follow the directions from Part 1.
Part 1: Shareware (Free) Doom
A. The Game Engine
If you were to break down the various components that make up the computer program that is Doom, they generally belong in one of two categories:
- The Game Engine - The core programs that tell the computer how to interpret the game files, display images on the screen, play sounds, accept player inputs, etc. The purpose of a game engine is to make the core of the game reusable in later games. The engine programmed by ID Software’s John Carmack in 1993, called the Doom Engine or id Tech 1, would later be reused in the sequels, Doom II and Final Doom, as well as several other games made by other studios (Heretic, Hexen, and Strife).
- The Game Assets - The levels, artwork, music, sound effects, enemies, guns, etc. Each of the different games that use the Doom Engine to run swap out the the game assets of the original Doom with those made for the game they are making. This allows video game development studios to drastically reduce the amount of time and money they need to produce a game, since the core programming is already done and they can focus on crafting the game itself.
Making games this way is still employed widely today. Popular engines like Unity, Unreal, and GameMaker are made to be multi-purpose and tend to require more work and expertise to program game-specific mechanic. Other engines such as RPGMaker, Adventure Game Studio, and Twine are designed to be used in games that fit a very specific genre, allowing novice game designers to build games with minimal experience.
While the Doom Engine was a masterpiece in its time (and still holds up well, considering), it was designed to operate on DOS (Disk Operating System), an older operating system that worked by typing in commands, rather than clicking on icons. Running it today requires downloading software to trick the program into thinking that it is being run on DOS. Not only is this process a bit fiddly, it doesn’t do much to take advantage of more modern developments in computers and video games.
Fortunately, ID Software released the source code for Doom under a Creative License in 1999, allowing anyone on the internet to download, modify, and redistribute Doomto the public. One of the products of this is GZDoom, a reworked version of the Doom engine that runs extremely well on modern systems and gives the player control of a huge range of options. In order to get Doom running, you’ll need to download the most recent version of GZDoom and save it to your Desktop.
-
Navigate to the GZDoom downloads page. From the 3 panels with download links here, we’ll be selecting links from the GZDoom panel.
- Click on the link that corresponds to your operating system. This tutorial is Windows-specific. If you don’t know whether your version of Windows is 32- or 64-bit, click on the Windows button in the lower left of your desktop, click on Settings (represented by a gear).
- In the Settings window, click on System, then About in the sidebar. The type of operating system (32- or 64-bit) will be listed next to “System Type”
- Clicking on one of the download links will start the download. Save the file to a location you can access frequently and easily, since you’ll be going there multiple times throughout this tutorial.
-
Once you’ve downloaded GZDoom to a location that’s convenient to you, extract the file into that location.
- Right-click on the zipped file and select “Extract All…”
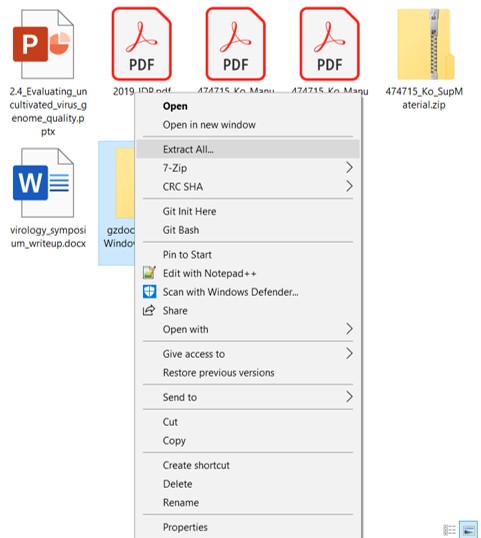
- This will bring up a window allowing you to choose the location and name of the extracted folder. For simplicity, I’m saving it on my Desktop and naming the folder “gzdoom”.

-
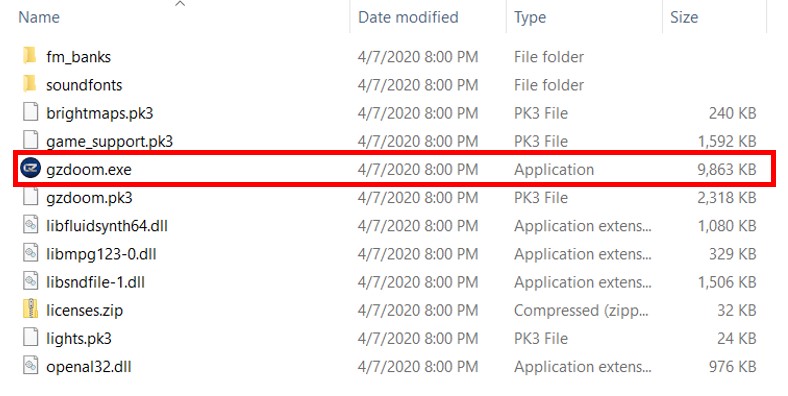
Open the extracted folder and try to start Doom.
- The open GZDoom folder should look like this. To start GZDoom, double click on
gzdoom.exe.
- This shouldn’t work, you should get the error shown here. The reason is we have setup the engine, but haven’t added any of the game assets yet. That’s coming up next.

- The open GZDoom folder should look like this. To start GZDoom, double click on
-
Navigate to the download page for the shareware version of Doom. Download, save, and extract the files.
- Clicking on the link above will take you to the page shown here. Clicking on the dooms.zip link highlighted here will take you to the download page.
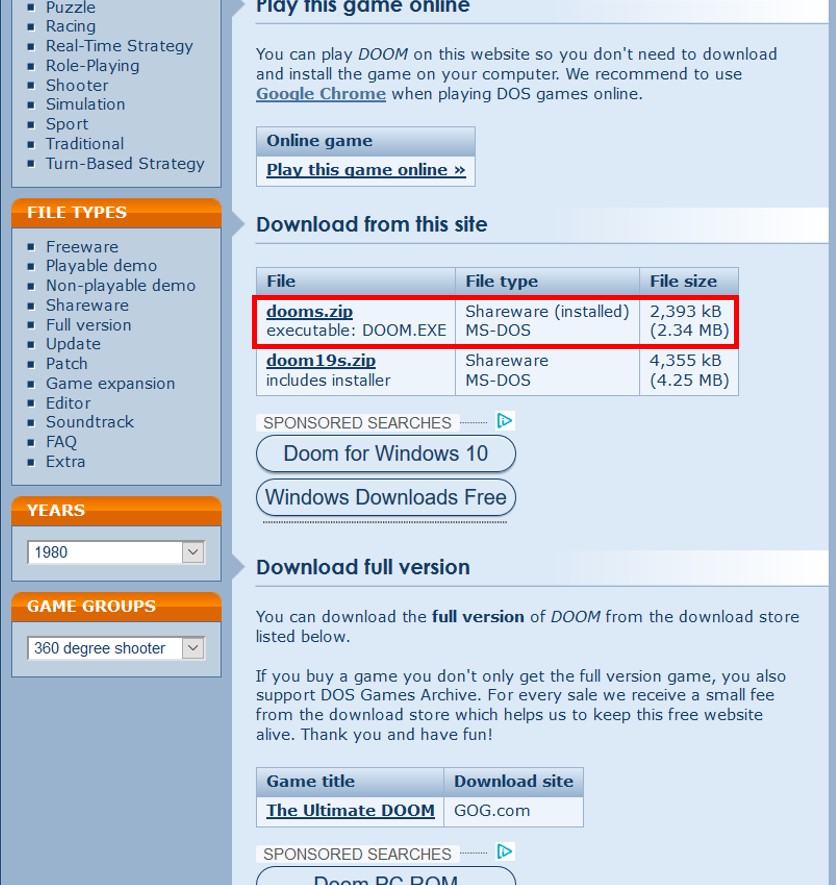
- As described for the engine above, save this zip file to a location you can access easily, and unzip the file.
-
Open the unzipped dooms folder, find the DOOM1.WAD file, and copy it into the GZDoom folder.
- Opening the now unzipped shareware Doom folder should look like this. You are looking for the DOOM1.WAD file.
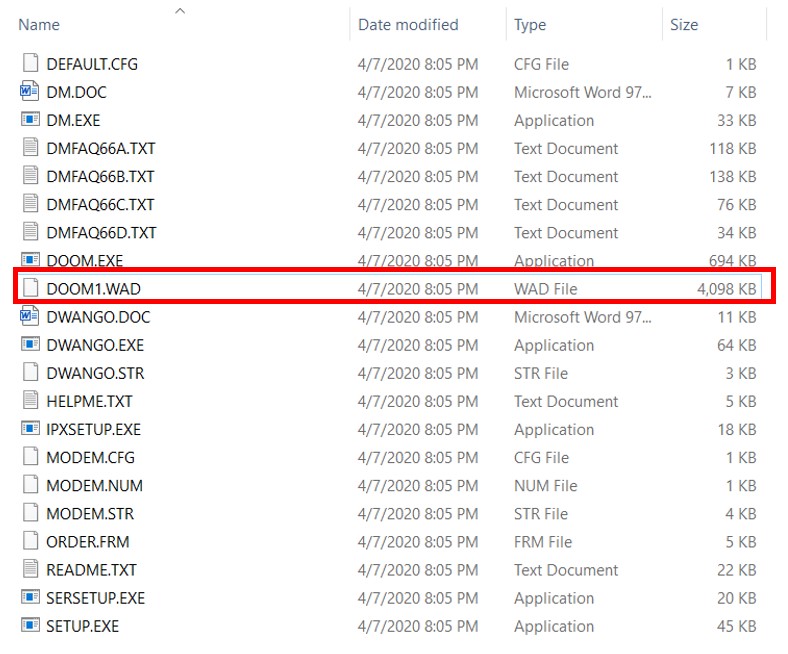
- WAD files contain all the assets for the game, compiled into a single file. Later on, we’ll be looking for WAD files in the full version of Doom, and in a later tutorial I’ll show you how to find these files in other Doom engine games, as well as download fan-made Doom engine games.
-
Start Doom! …and adjust a few settings.
- As before, double click on “gzdoom.exe” to start the game. Now it should open up Doom just fine, starting you at the title screen. You can press any button to start the main menu.
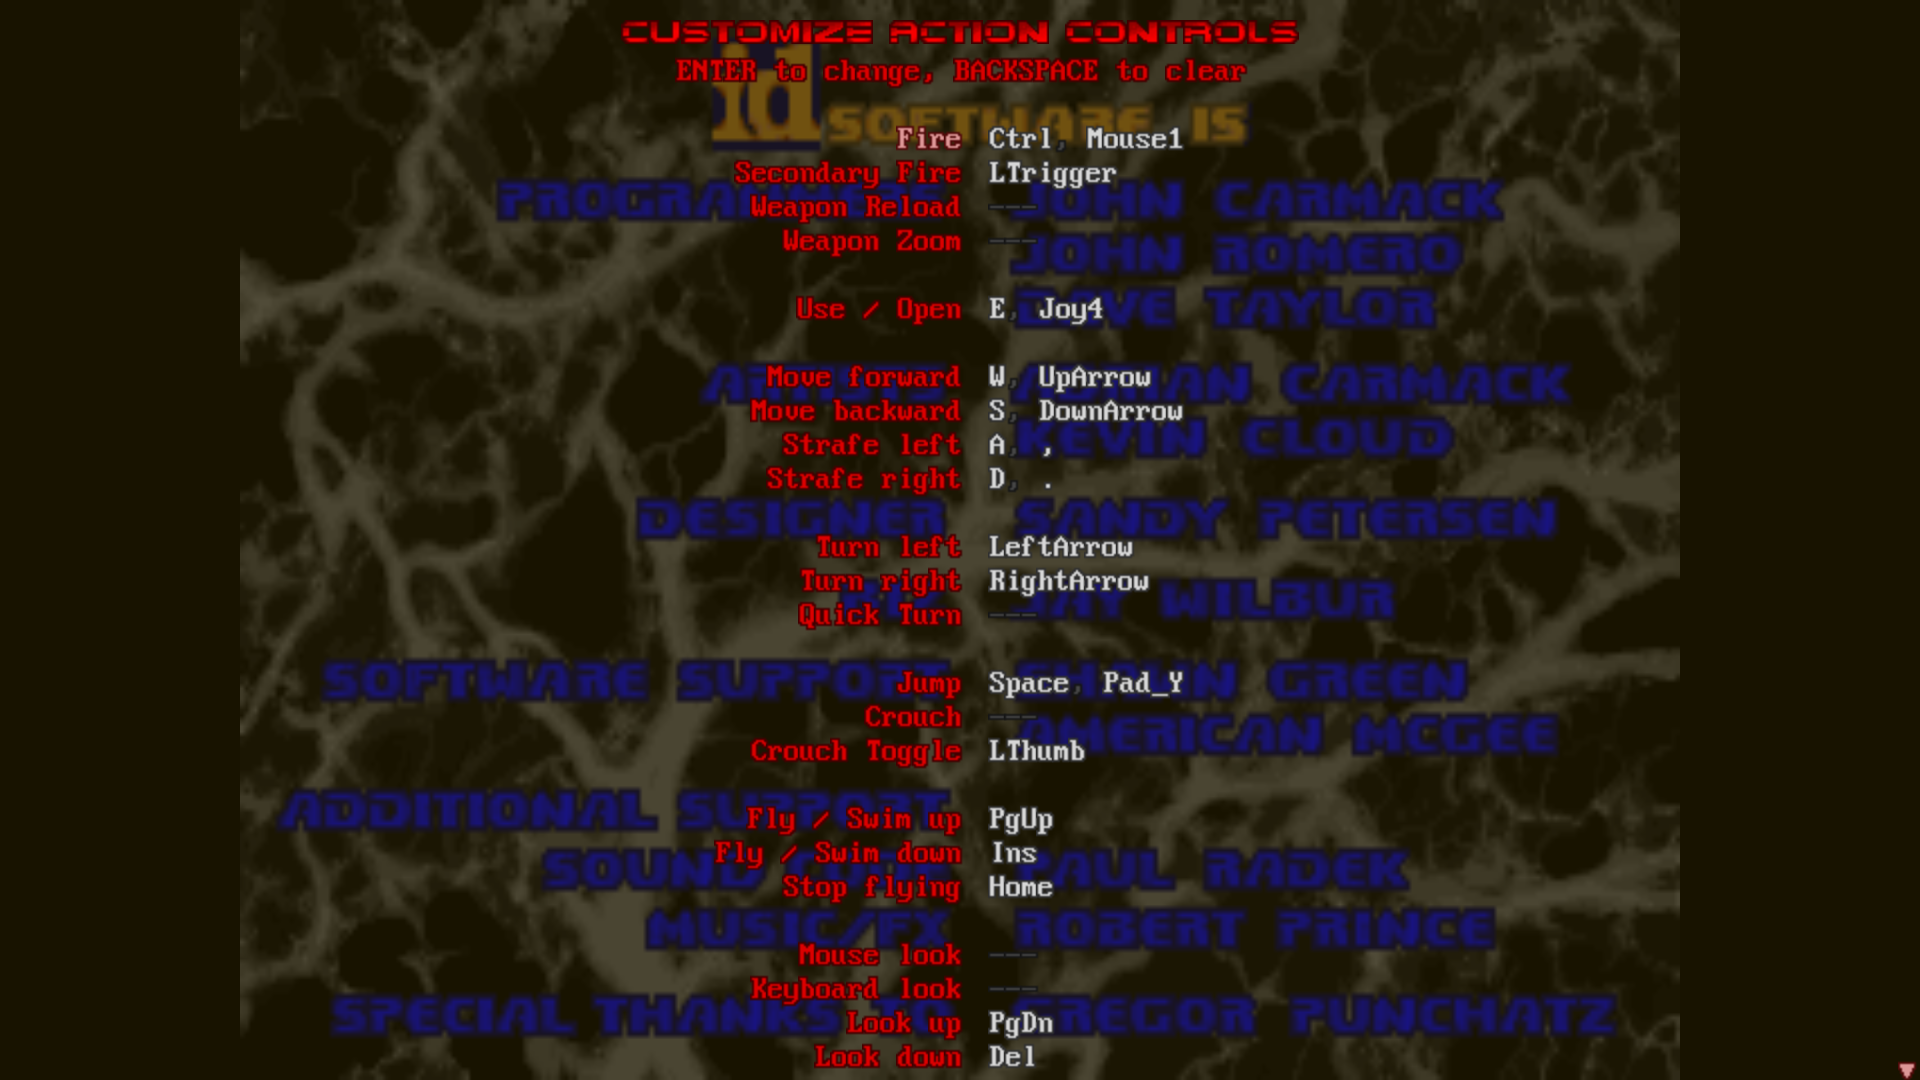
- Before you start playing there are a few settings I’d recommend to make your play experience better. First, select “Options”, then “Customize Controls”, then “Action”. Change the options to match those in the image shown here. You are looking to change the “Use/Open”, “Move Forward”, “Move Backward”, “Strafe Left”, “Strafe Right”, and “Jump” options.
- Next, go back to the “Options” menu and select “Mouse Options”, shown here. The original version of the game allowed you to control the movement of your character by moving your mouse. This control doesn’t work super well and will actually contradict movements you make with the other keys, so you want to turn the “Forward/Backward speed” all the way to the left.

-
Start Playing!
- To start a new game, go back to the main menu and select “New Game”
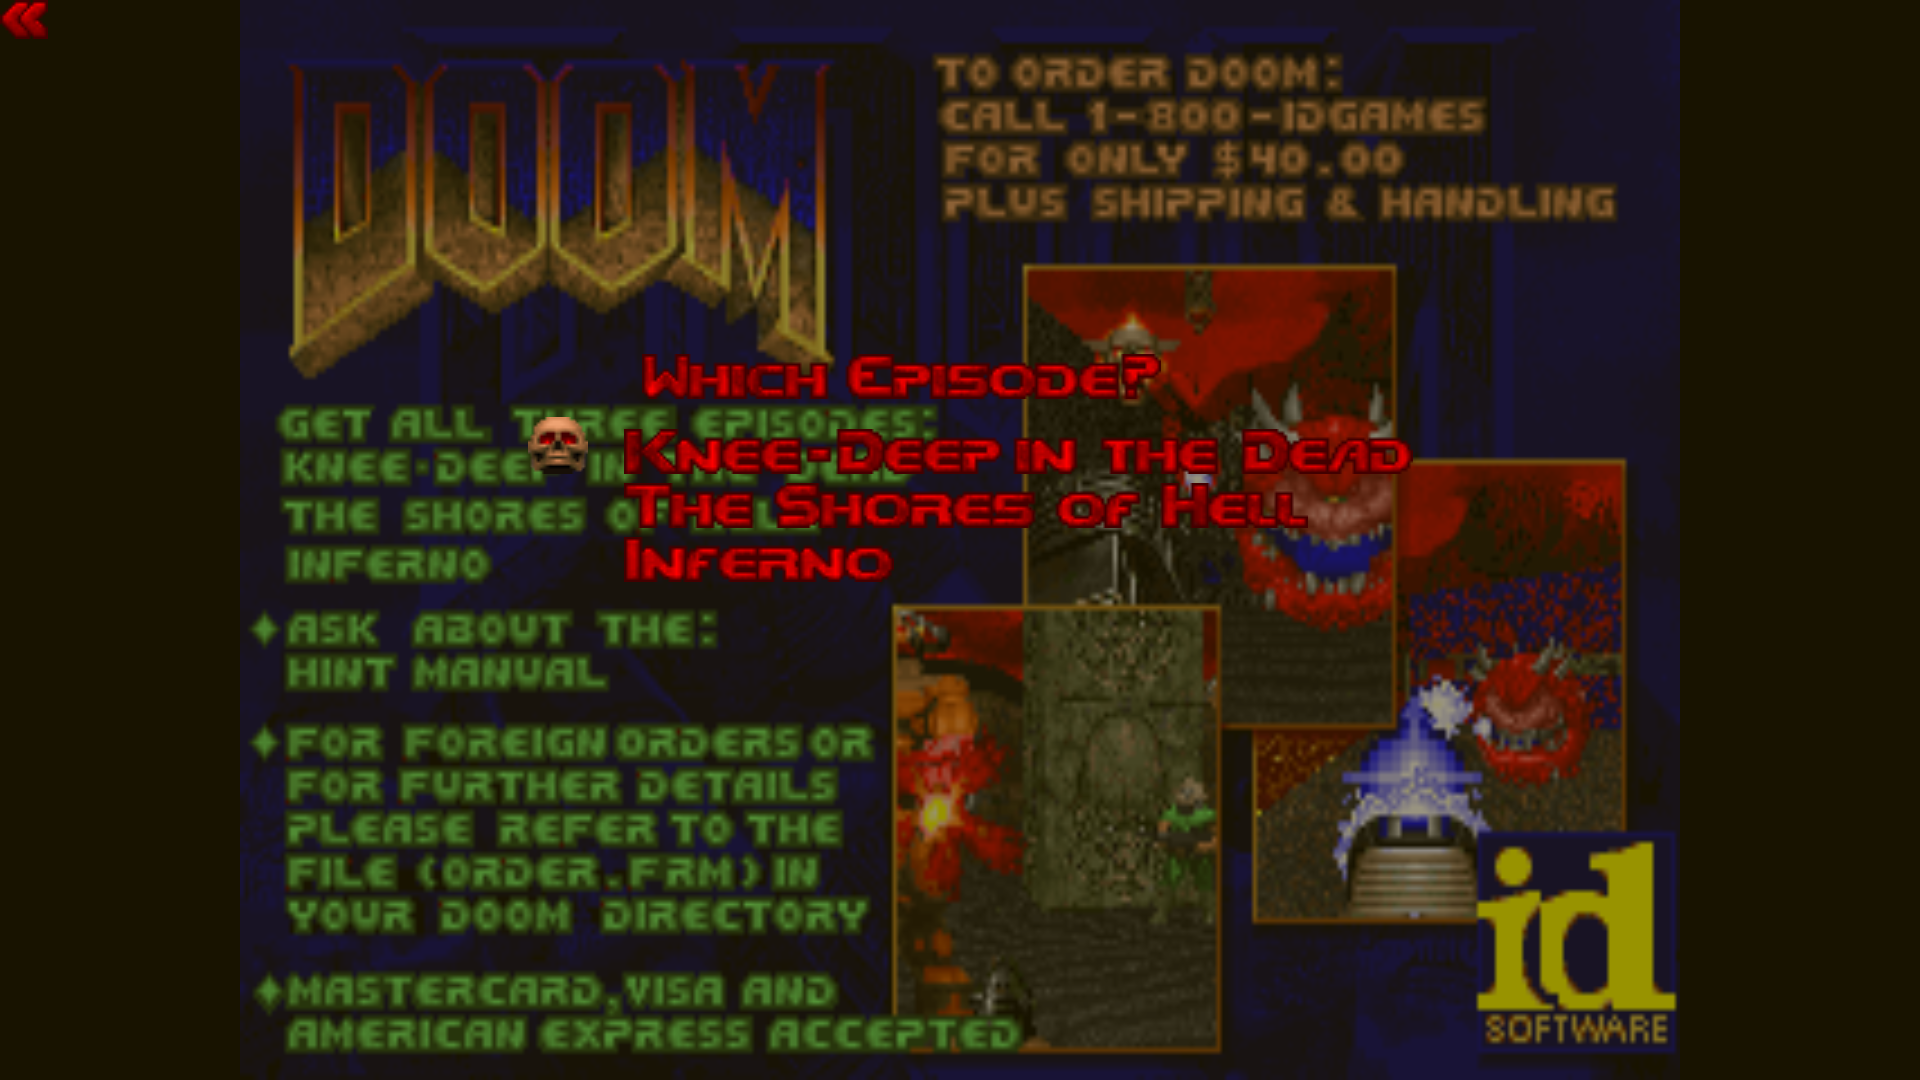
- This will bring you to the Episode select screen, shown here. Since this is only the shareware version, only the first episode, “Knee-deep in the Dead” is available to play.
- Selecting the episode will bring you to the difficulty select, shown here. The further down the list, the harder the game gets, “Nightmare” being pretty frustrating (I usually play on “Hurt Me Plenty” or “Ultra-Violence”). Don’t let the names get to you, choose a difficult you’re going to enjoy.
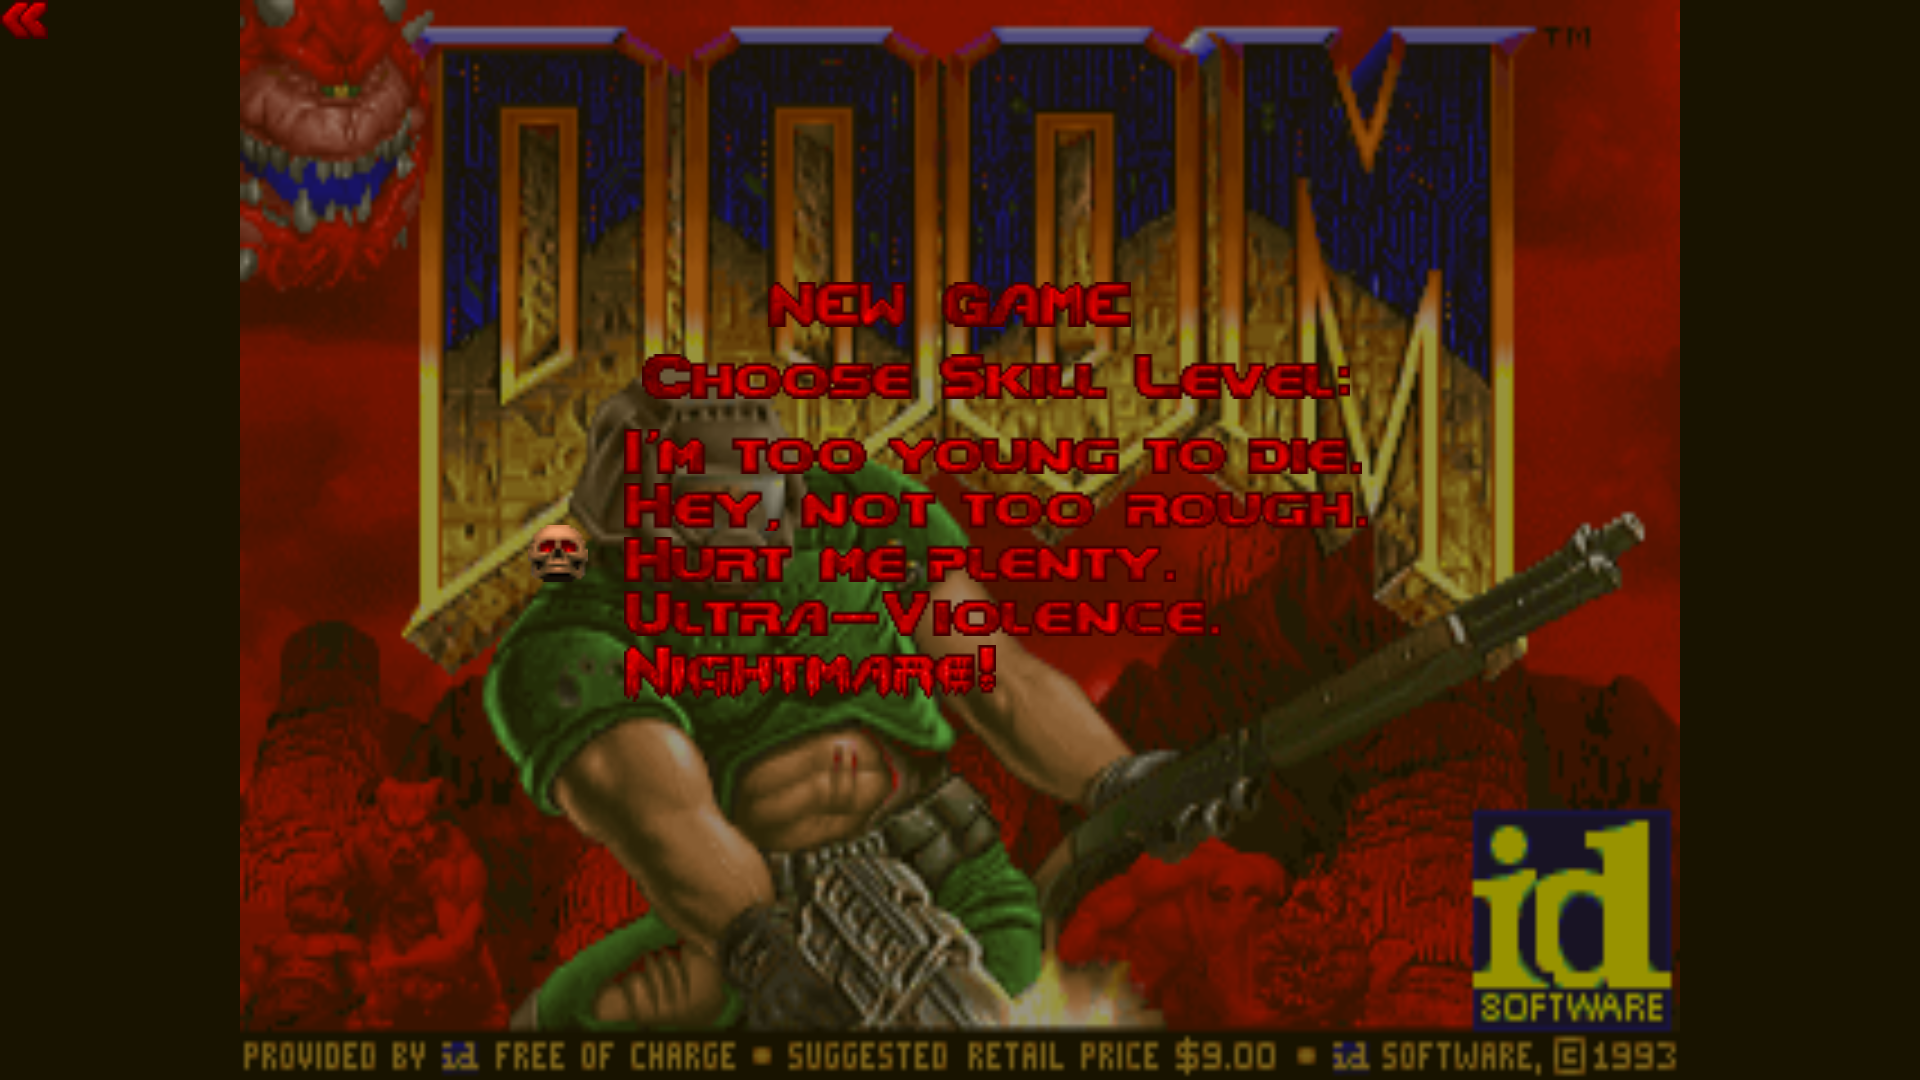
- Once you select a difficulty, the music starts, the screen melts and you are in the first level of the game, gun out.
- Moving the mouse left or right swivels your character around, and clicking the left mouse button shoots your gun. Once you get more guns, you can use the mouse wheel to switch between them.
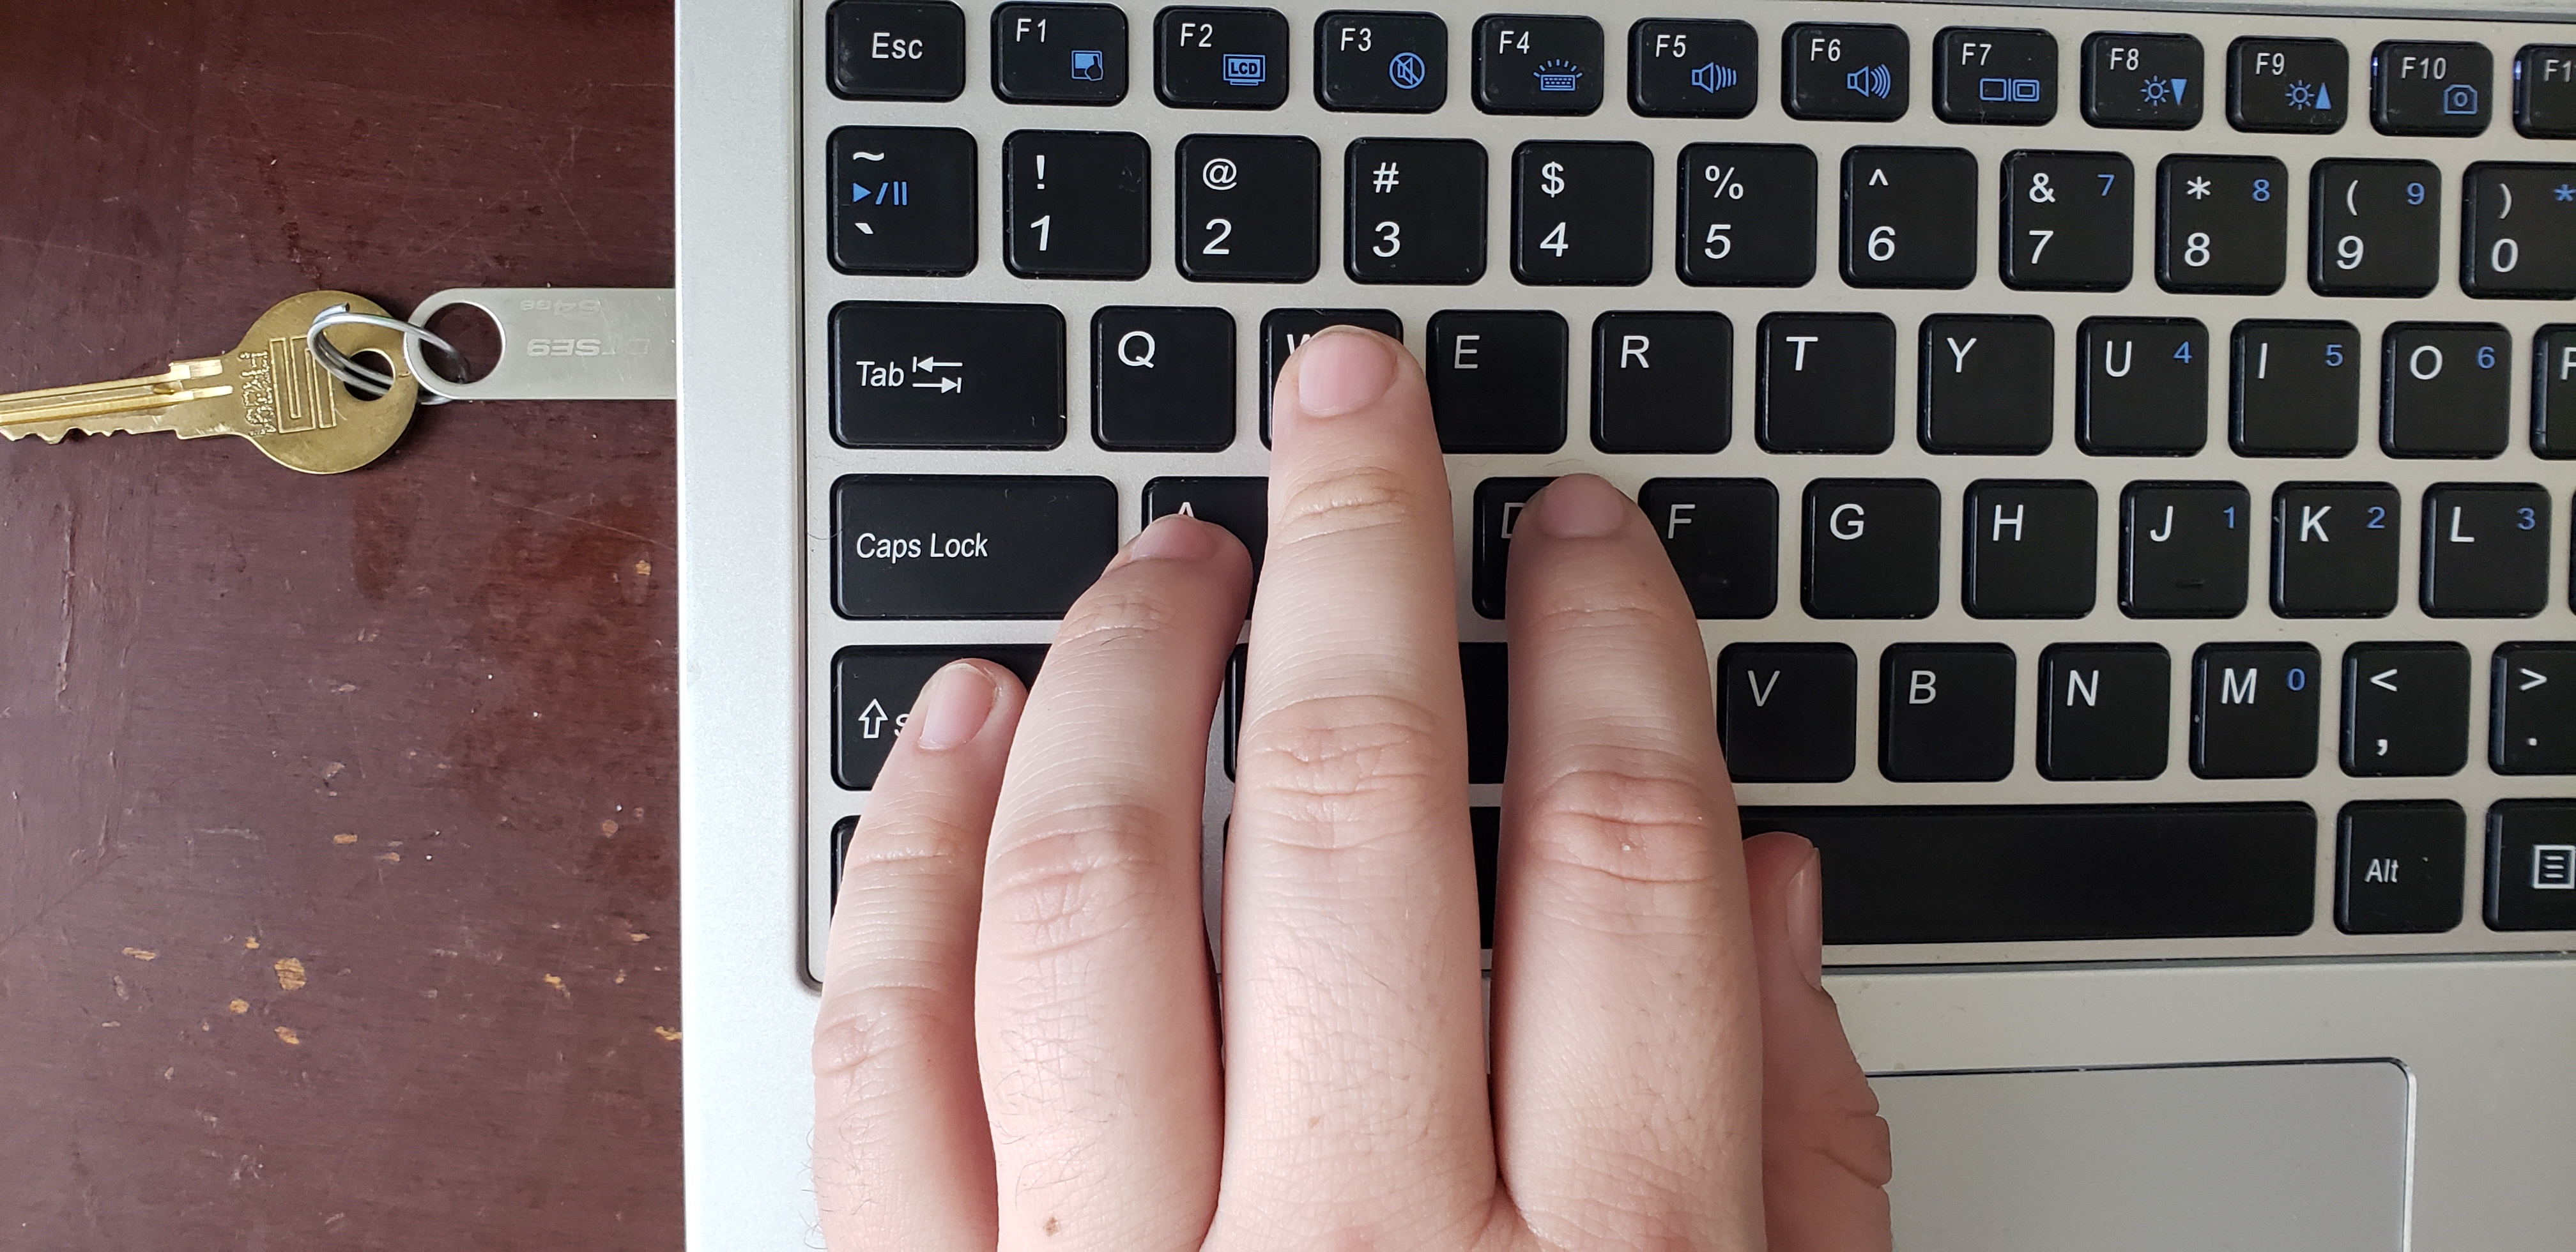
- You move around using W, A, S, and D, open doors and push buttons using the E key, Shift to sprint, and Space Bar to jump. The game originally tied movement to the arrow/cursor keys, but using WASD allows you to press other buttons on the keyboard more easily. You generally want to place your index finger over the D key, your middle finger over the W key, your ring finger over the A key, pinky on the Shift key, and thumb on the Space Bar, as shown in the picture below. You can shift your index finger up to the E key to open doors.
- It will likely seem a bit clumsy at first, but it’ll become second nature in no time. As you walk around the level, you’ll notice items on the ground, and walking over them will give you health, armor, or ammunition. You’ll also notice enemies; align the gun on the center of your screen with them and shoot them down before they kill you. If an enemy is standing too high up to shoot at it straight, don’t worry, the game automatically tracks shooting up and down. All you have to do is line them up horizontally and fire. The point of the game is to find the end of the level, marked by an exit sign, and hit the final switch (remember this is done with the E key).
- There is a bit more to the game, but this is enough to get you started.
Part 2: Ultimate Doom
So up to this point you’ve installed a modern version of the Doom Engine, copied in your first set of game assets, and started the game for the first time. Not satisfied with just the first episode? I don’t blame you, neither am I. This part of the tutorial will show you how to purchase the full version of the game and find the WAD files, so you can copy them into the GZDoom folder and start playing Doom.
-
Navigate to the Ultimate Doom store page on GOG and buy the game.
- GOG is a digital storefront that sells games you can download. They made a name for themselves in the late 2000’s working out licensing deals with game publishers to get old games working on modern computers and selling on the storefront. If you decide to continue playing video games on the computer, GOG is a great place to start looking for games, and I plan to feature more classics here in the future.
- For this tutorial, you’ll need to make an account (if you don’t already have one), purchase the game, and find it on your “My Account” page. When you click on the game in your browser, you’ll see a couple of different options. One is to download GOG Galaxy (kinda like itunes, but for games), and the other is to download a “Backup” installation of the game. While you may consider downloading GOG Galaxy (I like it), this tutorial actually requires you download the backup. img/gog.jpg
-
Install the game and copy the WAD file into the GZDoom folder.
- In order to find the WAD file, we have to install the GOG version of the game. Double click the EXE file you downloaded from GOG to start the installation process. Check the box to accept the EULA and install the game. When it finishes, exit the installation.
- When it’s done, you should see a brand new icon on your desktop for Ultimate Doom. In order to find the WAD, we need to see where GOG installed it, so right click on the desktop shortcut for Doom and select “Open file location”
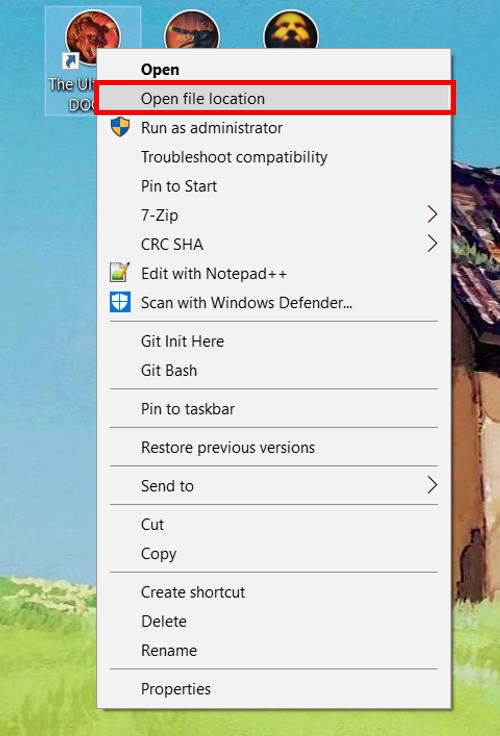
- This will open up a window showing a directory called “DOSBOX”. This is actually a DOS emulator that allows Doom to run on a modern computer, but it doesn’t work as well as GZDoom, so don’t worry about it. Navigate to the folder that contains this one and you should see a file called DOOM.WAD.
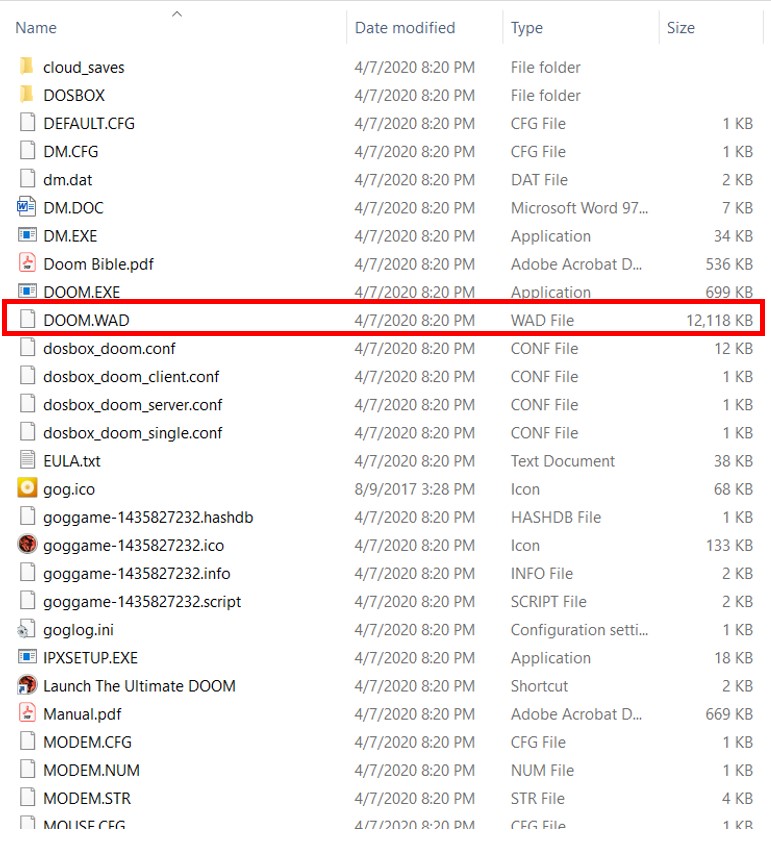
- Copy DOOM.WAD to the GZDoom folder and double click on gzdoom.exe
- When your GZDoom folder contains multiple different WAD files, starting GZDoom will pull up a dialog box that allows you to choose which one you want to play. Select Ultimate Doom, click on Play GZDoom, and enjoy!
Next time
In my next post I’ll walk you through how to add more content to your GZDoom installation, including both paid and free content available online.
As always, if you have any questions or concerns about the content of this page, feel free to reach out to me using the details on my home page.
Peace and happy gaming!